Showing posts with label diy. Show all posts

Wednesday, 6 August 2014

DIY Cable Spools to Side Tables


Well I thought I would be bringing the second tutorial to you today for making another great  Fake Out Weave Wall Hanging #2.  Well I am not going to give you that tutorial this week (probable next week), but I have a really good reason for this change, other than being a women and therefore it's my
prerogative, but it's also my blog LOL.

This is what happened. My building's elevator has been down for what seems like forever. I was walking past all the debris and what do I see........ a bunch of Wooden Cable Spools, all different sizes. I had to have them, all of them, but how?  I will tell you how, you go and ask someone if you can take them off their hands for them, how many you ask, well all of them of course.  I loaded those spools in my car so fast it would make your head spin.  I settled for 5 small ones and one large coffee table size.

I couldn't start fast enough.  I decided right away I wanted two of them to be side tables. I started going thru my stains, paints, tape, material all the usual suspects. The material I used was left over from a rug tutorial I did a while back DIY an Old rug to a New rug.


Let's Begin:

1.  First thing I did was just put the dish soap and water to them and let them dry over night.  Next day I puled all my tools and materials together.

  • Carpenters Glue/White Glue
  • Siccors 
  • Wood Stain
  • Paint Brush
  • Decorative Tape


2.  I taped off my spool and stained them in a dark brown wood stain, I used a brush and not a sponge brush, because a sponge just doesn't hold up to the grainy somewhat rough surface of the wood. It also leaves too much stain behind to soak up.


I only used one coat because I was a dark stain, but a second coat can be applied if you want it darker or richer.  I also did not bother with a lacquer top coat. I wanted to keep my as real to the real thing as possible, but that's me.  You may decided to paint them purple, who cares, go for it.

3.  Once dry you can start with the middle part of the spool.  I used some left over material from another project we did  DIY an Old rug to a New rug and some really cool leopard tape I had bought some months back, just because I loved it. 


4.  Then I went to town with middle of my spool. I measures out my material and cut it to be to wrap around the middle and I glued it down with Carpenters Glue or white glue would work also.  Now you may want to leave it at this point, because you love, that's great. Not me, I had to get that cool tape in there, so once the material dried I applied my tape around the top and bottom of the centre portion of the stool.


I love them, but I wanted to come up with some sort of a top tray so it could be used as a side table. I went to my local thrift store and found these. Now I know there is a proper name for them and I know you use them for your table and set you plates on them, but I can't remember the damn name of them. Anyway, I found two of them for a $1.00 for both.  I know they were it and I think I am right, what do you think?


And here is the finished side table


Here is where the reside with me, I love them. I can move them around when I have guest over. I have 3 more I will be turning into padded stools another tutorial to come LOL.


Thanks for following and next time I will bring you my second Fake Out Weave Wall Hanging.
Till then

Wednesday, 23 July 2014

Fake Out Weave Wall Hanging Tutorial


FAKE OUT WEAVE WALL HANGING


I have always admired those gorgeous weaved wall hangings and I always wanted to take up weaving and make one.  Well 20yrs later I still want one and I still am hell bent on making one myself.  Suffice to say I am not going to take up weaving classes anytime soon, so do the next best thing, cheat.  That's right cheat and I saw just the inspiration on Pinterest months back. Right after I pinned it I started making my own.  I will tell you before you begin, it is addicting.  I am still making them.  I will start with the smaller wall hanging first and once you fall in love with it, I will show the second one I did right after at a latter date.

I also wanted to mount mine from a branch, but you could use a wooden dowel.

Tutorial

Let's begin:

First figure out the colours of wool you want to use.  I would suggest at least three different colours. Next, how thick do you want you wool. Keep in mind, if you use the thinner wool you will have to use more of it to get the thickness you will want, so although cheaper to purchase per ball(pkg) you will need twice as much. I went with the thicker wool.  Also, you can purchase wool at second hand stores. I bought mine at Value Village and I got 6 balls, 3 brown and 3 gold. I already had the white and black on hand. Which gave me plenty for this project.

You will need:

  • Wooden Dowel or Tree Branch
  • 2-3 Different colours of wool/each colour should have 2-3 balls.
  • White Glue
  • Sharp Scissors - very important, otherwise you will not get a nice straight cut
  • Piece of Cardboard or bristol board (use to measure you wool strands)
  • Paper & Pencil


1.  Loosely sketch out how you want your hanging to look. Where you want your different colours to go.

2.  Once you know how much of each colour you going to be using, you need to start cutting your yarn. Now you can cut them at all different lengths or you can do what I did and cut them all the same length and trim them to length afterwards, up to you. I used a piece of old bristol board and wrapped my yarn around that and made just one cut.


3.  Find a door or a wall to hang up you branch/dowel, as you can see my door in my craft room door gets well used. I then marked the middle of my stick so each side of stick (left & right) would be even.

4.  Cut you first batch of wool, cut enough for both sides of the middle string. I cut my gold yarn first and started gently laying it over my stick evenly on both side of string.


5.  Once you got one colour done, then starting from the middle again move your yarn over towards to ends of your stick and start with your next colour and work evenly on both sides again.


6.  I put my white in the middle and decided I wanted to wrap them separately. I then decided I wanted my dark brown to go on the outside, which I left right to the end and just put same amount on each side.

7.  Now the tricky part! patience is needed here.  Don't cut you yarn/wool yet. You have to glue down the yarn to the branch/dowel.  Starting from each END, Carefully lift each section up from the stick, I used my pencil to lift each section up and put a generous amount of white glue on the branch and drop your yarn. Once all glueing is done carefully put pressure on yarn so glue will attach all pieces of yarn.

8.  Let thoroughly dry and them trim. TA DA!!!


9.  I love it!

Please feel free to drop me a line if you have any question or if you would like to purchase this great fake out weave wall hanging.  It is selling for $50.00 if your interested.

10. Let me show you where it resides in my apartment for now.


Sunday, 13 July 2014

Mixed Media Lesson


Layers of Life – Sherrie Giroux 2013, Mixed Media


I have said many times that Pinterest is one of my biggest inspirations when I get itchy to create.  I found an inspiration on one of my 2 hr marathon at Pinterest, but it was worth it because I came away knowing exactly what I wanted to create. I wanted to work with the layers – just like the different layers and the different directions we all take in our own lives.  I thought about what I wanted to use in my interpretation and decided on the following:

Canvas:    I used 14 inches x 8 inches


Brushes:  I used smaller brushes, I used foam brushed, but there are no rules

Wood Stain:    washable wood stain, I choose two different browns

Lots of white tissue paper

Gold Paint, Black Paint -   you can use what you wish, I would keep it washable paint.
Scraps of textures:   corrugated cardboard, wool, felt, etc.

Mod Podg:e            I must confess, I never buy the stuff I always make my own. So easy, So
                               Cheap.  I mix mine up in a big batch and just put a lid on it and it will 
                                last you quite awhile.  If it gets thick just add more water.

Mixture:                                              1 part white glue
                                                            2 parts water
                                                           

Okay Let’s Begin

Space and Ventilation is needed for this project.  First layout your board and decided how you want you template to look.  I choose 6 equal spaces measuring approx. 11.5 x 7.5  I used a vey dark pencil and marked them in.

Step One
Prepare you canvas.  Using your tissue paper cut out you squares Separately and glue on each square.


*Tips*
Cutting out your squares individually and a little smaller allows you to create depth in your painting, because you will have room to shadow your lines between your squares. This willhelp not make your painting flat and will give it depth.

Scrunch your paper squares up first before you apply your glue, this also gives not only depth, but texture to work with.


Step Two
Set up your wood stain paint.  I kept it simple I choose to use only two colours.


Step Three
Take one rectangle at a time and play with your stain, using your brush to create texture and colour. Don't go into this with limitations. Enjoy the process of seeing what you can create rather than just dictating where the process is going, let it the process and joy take you there.

Step Four


After you have painted a bit of the tissue paper you get an idea of what you can create. Now I want to introduce a new texture, guess what I am using Paper Towel!  Check it out below.


Step Five

I liked the texture of the paper towel and it's thickness. After applying the black and gold paint to it I was pleasantly surprised. Once all my corners were painted I went around my apartment looking for more inspirations.  


I liked the gold paint I already used so when I found this white tissue with gold stars on it, I grabbed it.  I also found bits of left over material in my box of scape material. It can be anything you fancy.  Think texture, colour.  When I lay a scrape of tissue paper over the material scrapes it will give it more depth once apply it on with my white glue mixture.  Again I suggest doing one rectangle at a time.  Just use your white glue to glue down all mixed media one at a time, either just gluing them on or using you tissue paper to knock it back a bit and give it more depth .

*Tip*  You can use a hair drier or a heating gun to speed up the process, but a word of caution, Be Very Very Careful because you can dry it too fast and it will crack and/or discolour your painting.

Step Six
It is hard for any artist to know when to stop, but I can tell you my secret.  Step back from your painting often, just to look at the picture and feel of the painting.  Is it too dark or light. Don't panic, live with it for a day. Go back fresh the next day and change it up. Also, don't forget most of the time they are no accidents, just happy mistakes.

I ended up using a clear varathane all over the top, which gave my painting a darker richer colour overall, I love it!!

Now I realize this small tutorial is not going to make you an artist, but it will show how to have fun and work with mixed media.  Please feel free to drop me a comment or email me with any questions you may have.

Now can I show where it resides till I sell it, yes I do sell my artwork from time to time. If interested please check out my Shop.


Monday, 21 April 2014

Organize Your Bathroom - Using a Shoe Organizer


 I took sometime this weekend to organize my bathroom. It just had to be done. I am sure we all go thru the same thing with all the "stuff" we have in our bathrooms. My biggest pet peeve is pulling out my straight iron or my blow dryer and trying untangle all the cords and everything it has found to wrap itself around.

Saturday, 29 March 2014

DIY Old Rug to a new life

HOW TO MAKE A NEW RUG OUT OF YOUR OLD RUG


I have many new DIY projects to share with you.  For the last couple of months my clients and I have done some amazing DIY projects that ended up savings my clients a considerable amount of money. That is why I started this blog, because there are so many things we can do not only save you money, but you also learn to redecorate and redesign your home within you budget.

This project was done on the cheap, I think it's not only gorgeous, but unique. We wanted a statement rug. Something to really pop and anchor the room. Well we all know to purchase an accent rug can cost you quite a bit of money depending on size a quality. So this is what I came up, see what you think!


FIRSTLY - USE A PIECE OF YOUR INDOOR RUG - I USED SOME LEFT OVER PIECES FROM THIER WALL TO WALL CARPET. YOU COULD ALSO GO TO A CARPET STORE AND ASK FOR THE LEFT OVER PIECES, OR THE GOOK OLD THRIFT STORE.

The important part is the BACK OF THE RUG. Why? because it has to hold up to the painting that you will be doing on the back of the rug. Okay let's get into it.

What you will need:
Rug
Material
2 Cans of Tester Paints:  this is one of my best suggestions for small projects, or to decide on a colour for your wall from all different sun/light sources.
Paint Rollers/Brush
Duck Tape - colour of your choice, I suggest check out your dollar store 
Carpenters Glue
Large Drop Cloth


These are the tester I was suggesting, much cheaper.

Below are the tools I used


you can see my piece of carpet and the back that I am going to paint. Put your drop cloth down and your carpet wrong side up. Collect your paint samples, duck tape, roller


   This is the piece of Material I choose to use, just make sure   what you use is durable. I choose to burlap.


I laid out my carpet Right Side down. As you can see my cat Max always has to get in there.


Let's Start Painting!  I decided to paint my rug almond and black. I wanted to have an almond stipe on both sides of the material that will go straight down the middle of the rug.

First you paint both sides with the almond. Then measure and measure again, then tape where you want your stripes on both side of the rug. 


Then paint both side black. When dry rip off the tape and ta do you have your strips.

When all is dry, your ready to glue your material down. Again measure and measure again to centre your material. Now your ready to spread your glue. I used Carpenter's glue, but you could also use white glue. Which ever you use make sure you buy a big quantity. 
* TIP:  I put my glue on crosswise approx. four inches apart and then using a foam roller to spread it out. Make sure to glue all edges well.


As you can see as is starts to dry a bit and you will see where your material can buckle once it starts drying. No worries just your foam roller and roll it out. 

Thursday, 10 May 2012

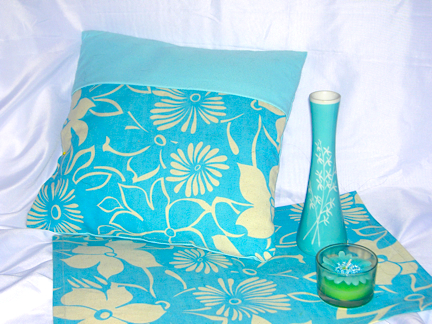
DIY Cushion Covers-Quick & Easy


Quick & Easy DIY Cushion Covers – Cheapest Way to Brighten Up Any Room


One of my latest DIY Projects is freshening up my Living Room for Spring/Summer. I will have a lot of great future DIY projects to blog as I get my living room done. For now, lets start with cushion covers. Cushion cover are one of the cheapest and easiest ways to freshen up your living space. Think of using fabric you already have. For example, a scarf you love or a old sweater. I also have bought pillow cases on sale (king size, you can get two covers). If you are going to buy go to the Rembrandt section where they have end of the roll pieces. Well enough with the suggestions, lets get started.

What you will need;
  1. Form pillows or just recover your old ones as long as they still hold their shape.
  2. Fabric pieces
  3. Lots of straight pins
** you can also use ribbon or buttons to embellish.

   For the purpose of this tutorial I am using a stripe material so you can see the width and length better.

Lets begin;
  • Take you material, you will need enough to double to the size of your pillow, also adding 4 to 6 inches top and bottom for your cuffs (don’t worry this will makes sense a little further down), for now just trust me and add the extra inches top and bottom.
  • Also make sure you have at least 2 extra inches on each side of you your pillow form, so you can stitch a good seam.
  • Place fabric good side up, then place your pillow approx in the middle of the fabric, (remember you have doubled your fabric to the size of your pillow form and added your 4 extra inches top and bottom of fabric. Make sure that you situate your pillow on the fabric so you will get the pattern you wish on the front of your pillow.


  • Now your going bring up the fabric from the bottom, at least 2 inches past the middle of the pillow. Now pin your cuff down 2 inches.
  • Repeat for top of fabric, again turning and pinning the cuff

Very important – make sure your cuffs overlap so when you insert your pillow the cuffs will not pull open. I learnt this the hard way the first couple I made. So I in fact like to have my cuffs (cuffs means the opening you will be inserting your pillow thru) overlap a good 2-3 inches this will give you plenty of room for your pillow to insert your pillow and it wont pull open.
  • BEFORE you remove your pillow, pin the four corners of you side seams, this will give you your side seams. It is also important to pin these seams snug. This will make for a much firmer and fluffier pillow (I also learnt this the hard way)

  • Now you can remove pillow. Take a ruler draw your side seams matching up all your corner pins.

  • Do not remove any pins. Use you iron and press your cuffs, press your top and bottom of the pillow, this will give you a nice crease for the top and bottom of your pillow cover.
  • Once all pressed, your ready to sew
    .**Remember your sewing your cover inside out***
  • I would suggest sewing your cuffs first, then sew up your side seams.
  • Turn your cover over and your done.

Insert pillow, give it a good fluff.

TA DA!! DONE
Be Proud you just made your first pillow cushion cover!!

Please Come Back soon. My next blog will be how to cover a bolster pillow. Even easier.

Since I am new at this and am still learning, I would appreciate any comments, questions and most importantly feedback.

Till next time!!

Sherrie